GUIDO TACTICS
Cerberus, le Monstre à trois têtes.
Dans la mythologie grecque, Cerbère est parfois appelé le “Chien d’Hadès”. Cerbère est ainsi un monstrueux chien à trois têtes qui gardes les portes des Enfers pour prévenir toute fuite des morts. Cerberus est ma première tactique pour FM18 à être publié et comme la bête multi-tête, elle tourne autour de trois attaquants très efficaces causant chaos et destruction à travers les défenses adverses.
En tant que manager pragmatique, je me suis retrouvé à lutter contre le jeu pendant la phase de bêta, déchiré entre essayer de faire briller les stars de mon équipe et maintenir un système propre et cohérent. Le fanboy en moi voulait faire briller les stars comme dans la vraie vie, voulait imiter les records fous de Messi et Cristiano Ronaldo, alors que le fan absolu du Strikerless en moi ne voulait pas compromettre les idées qui rendaient le strikerless aussi bon que lors des opus précédents.
 Les contours de l’Equipe
Depuis le début de la série Football Manager est une simulation d’un match de football réel (que ce soit 2D ou 3D), il s’agit essentiellement d’un système composé de vingt-deux joueurs (anciennement les plots 2D) se déplaçant avec les limites de la zone du terrain et soumis aux restrictions des règlements. Dans le passé, pour moi, cela impliquait que le football ne concernait pas les individualités à proprement parler, mais les groupes de joueurs et les liens entre eux.
Personnellement, j’aime planifier méticuleusement mes tactiques, avec la préparation de l’équipe divisée en trois niveaux.
- J’entraîne mes joueurs individuellement sur un ensemble de compétences qui convient aux rôles que je m’attends à ce qu’ils jouent.
De cette façon, je peux les équiper avec l’ensemble des compétences nécessaires pour accomplir les tâches attendues d’eux dans les limites de la tactique que j’ai créée.
-
Deuxièmement, dans une tactique de base générale, je configure des ajustements spécifiques pour chaque joueur en lien avec les adversaires auxquels nous serons confrontés.
-
Je mets en place des stratégies pour tenir sur un championnat long et des campagnes européennes, replaçant chaque match dans son contexte en reconnaissant qu’il est impossible pour une équipe de maintenir des niveaux optimum sur une période prolongée, ce qui nous permet de conserver de l’énergie pour les périodes les plus chargées de l’année
Cette tactique Cerberus suit strictement ces lignes directrices : il s’agit essentiellement d’une équipe construite autour de plusieurs listes de joueurs travaillant ensemble dans une unité cohérente. Travaillant dans un schéma 4-1-2-3-0, la tactique s’aligne de façon à dépasser les adversaires en essayant de maximiser l’utilisation de toute l’aire de jeu, rendant le terrain plus grand en possession et plus petit en défense. Cette configuration est un effort nécessaire pour trouver le bon équilibre entre les joueurs créatifs et ceux qui ont des pouvoirs destructeurs mais aussi entre la défense et l’attaque tout en gardant l’objectif de privilégiés la qualité de l’opposition et les pressions spécifiques de chaque match.
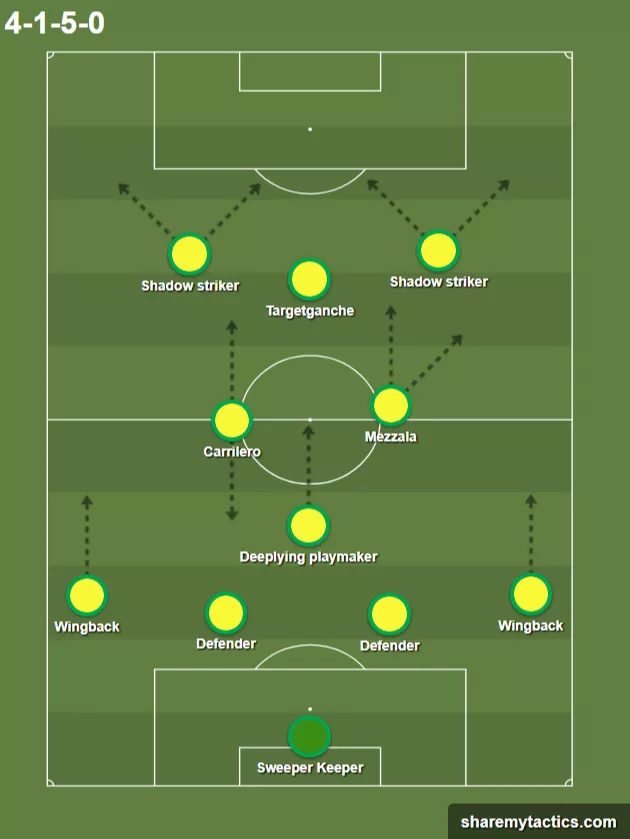
L’idée de jeu et de construire une assise collective solide lié à un mouvement de jeu coordoné pour créer un jeu de possession fluide. En observant les rôles (pour les joueurs) choisit vous pouvez constater que Guido met l’accent sur une approche de jeu rapide et très verticale.
Défensivement, l’aspect principal de cette philosophie est la façon de défendre particulière de l’équipe.
Fidèle aux principes que j’ai mentionnés plus tôt, il s’agit de manipuler l’espace. Défensivement, nous voulons limiter l’opposition autant que possible.
Le bloc défensif
En termes de joueurs défensifs purs, je n’ai que deux rôles purement défensifs dans ce schéma. Cela ne signifie pas que j’ai tendance à ignorer les défenseurs.Alors que la ligne défensive est souvent ignoré, leurs performances ne recevant généralement qu’un bref coup d’oeil ou une reconnaissance tacite prise pour acquis, je reconnais leurs valeurs pour mon équipe.
Ces joueurs font un travail ingrat, brisant les attaques, contrecarrant l’opposition et faisant le travail de sape. Une erreur leur réputation s’envole. Particulièrement avec ma tendance à jouer des lignes défensives presque suicidaires tellement elles sont hautes, le bloc défensif triangulaire au cœur de la défense est d’une importance vitale pour la domination des efforts de l’équipe. Ce bloc dirige l’ensemble de l’équipe et agit comme sa fondation. Des défenseurs centraux et un milieu défensif sont tout ce qui est nécessaire.
Un facteur très important que je ne peux négliger tellement son importance est cruciale est mon milieu défensif. Celui-ci est un peu un joueur hybride dans cette tactique et il contribue à toutes les phases du jeu, depuis l’attaque, aux transitions mais aussi dans les phases défensives. C’est dans cet optique que je l’inclue dans mon bloc défensif afin de voir commence il protége ma paire de centraux.
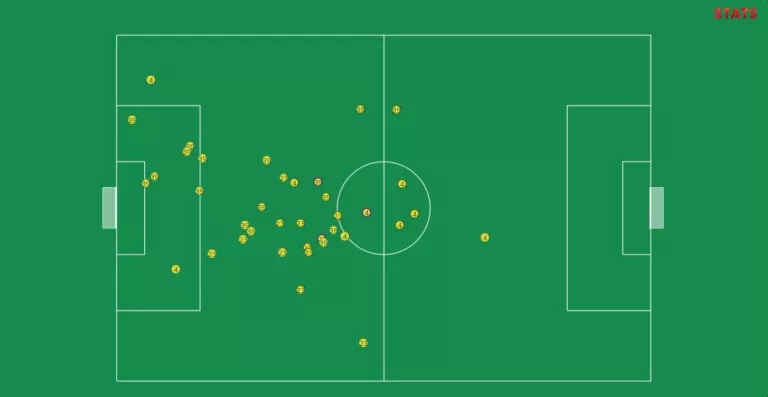
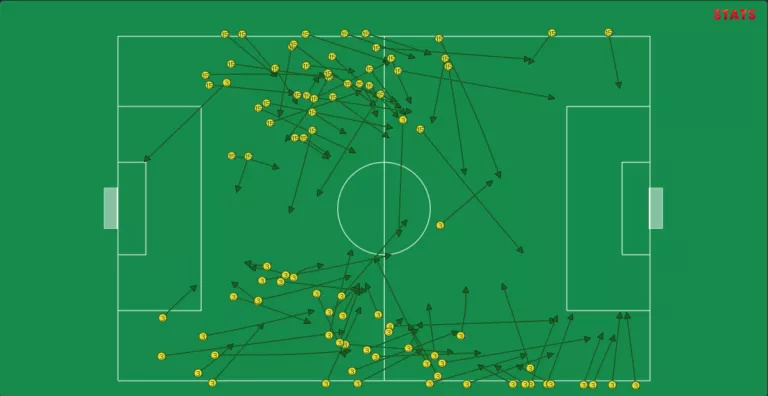
Cette capture d’ecran vous montre le nombre d’interceptions et de tables réalisé par mon trio défensif, le #4 étant Wessel Dammers mon milieu défensif, tandis que les numéros #23 et #39 correspondent à mes centraux Perr Schuurs et Allasane Diaby. Mon association de centraux annilhie la plupart des menaces offensives dans la surface de réparation tandis que mon Milieu défensif bloque l’espace en amont de la surface, tentant d’intercepter le ballon dans les pieds des buteurs.
Les défenseurs centraux tentent par ailleurs de s’impliquer dans le jeu. Ils utilisent parfois de longues passes pour tenter de lancer nos 9 et demi en profondeur. La plupart de leurs passes en retrait en direction du gardiens trouvent leurs origines dans les interceptions ou les duels gagnés contre les attaquants adverses, alors que la plupart des passes ratés correspondent à des dégagements ratés. Pour des défenseurs centraux on peut dire qu’ils se débrouillent plutôt bien pour les passes.
Les passes du Milieu défensifs sont généralement à vocation offensive, ce qui signifie que nous en parlerons plus tard. Pendant que les corvées défensives incombent principalement à la paire de centraux, ce milieu agit aussi comme un bouchon pour l’adversaire, tandis qu’il ancre le bloc du milieu sur le terrain il permet aussi aux défenseurs de l’utiliser comme relais pour évacuer la pression.
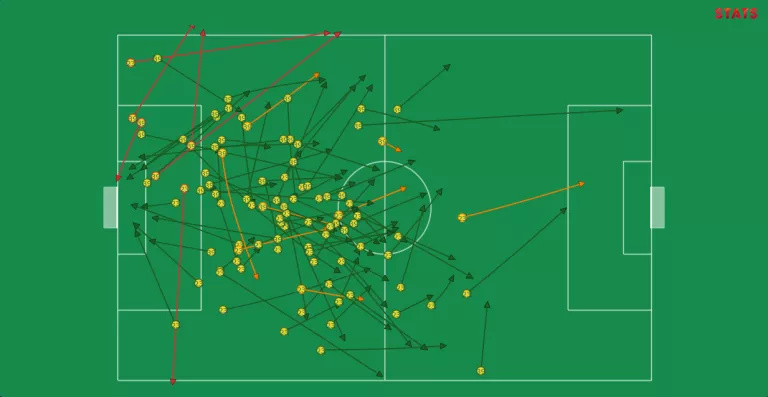
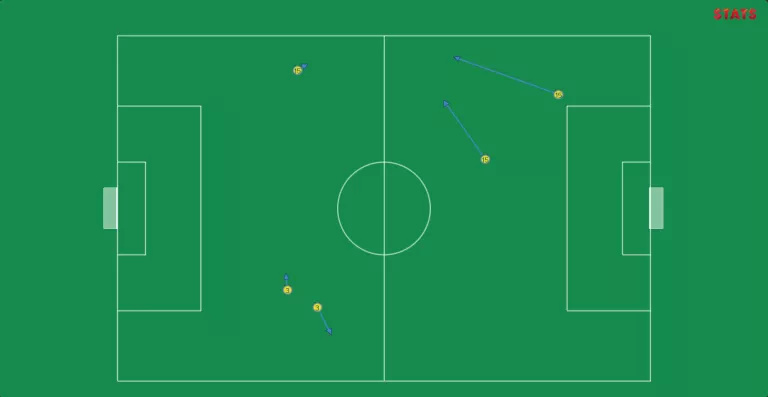
Ce graphique centré sur les passes montre dans quel zone le milieu défensif reçoit le ballon. Il s’oriente généralement d’abord latéralement sur le terrain, se déplaçant de gauche à droite dans sa zone principalement voir légérement plus haut de temps en temps. Par son positionnement il protége la ligne de défense agissant comme un bouchons pour ses défenseurs qui n’ont plus qu’a concentré leurs énergies sur les départs des attaquants.
Le Porteur de Lance.
Un porteur de Lance etait un homme qui se tenais dans le hall lorsque Caesar passais dans le couloir, observais les menaces et lancer sa lance au besoin. C’est un personnage jetable de l’histoire généralement. Ils sont bien souvent utilisé pour posé le background ou servir d’adversaires dociles sur le chemin du héros. Dans ma tactique le porteur de lance se trouvent sur les extrémités latérales du terrain, comprenais ce sont mes latéraux.
Dans un même style que ses collègues défenseurs centraux, ils ont dévolu à une tâche ingrate. Ils ont pour mission de contenir les menaces venant des côtés et de fournir une largeur offensive malré le fait que ce soit une tactique très axial. Beaucoup de courses seront faites pour peu de remerciements.
Le diagramme des passes souligne bien leur apport sur le terrain, ils passent énormément de courses sur les flancs sans obtenir de récompenses bien souvent. Ils parviennent souvent à remonter le ballon mais ne penetre que rarement dans la surface adverse.
In terms of their runs down the flank, the recurring theme of hardly ever catching the spotlight applies as well. They pour tremendous effort into their runs down the flank, but they are mostly utilised to defend the flanks and act as the occasional wide outlet going forward. They are not raining a hail of crosses into the penalty area since this is not FM16.
The unsung (hybrid) hero
One player who I feel warrants attention, in this case, is the defensive midfielder. He is the hybrid player of this tactic, the unsung hero who ties the lines together. He doesn’t excel offensively, he’s not the one making the Hollywood-passes, nor is the one to score a heap of goals or rack up assists like it’s nothing. He isn’t a proficient force defensively, normally he’s not the one with the great last-ditch sliding challenge or the skilful tackle on an opposing player. No, this defensive midfielder is supposed to be the master of the transition phase of play and his main weapon is his positional awareness and vertical and lateral movement across the pitch.

I have included the deep-lying playmaker as an integral part of both the defensive block as the midfield block, yet I still opted to name him as a separate entity in this list because of his status in the team as a hybrid player, who contributes to all aspects and plays an integral role in offence, defence and the transition phases between them.
The heartbeat of the team
The midfielders are the heartbeat of this team, offering interchangeable partnerships, each one carefully selected to add a specific touch, a clearcut aspect to this particular blend and union of roles. Effectively, this is the setup I have chosen to work with.
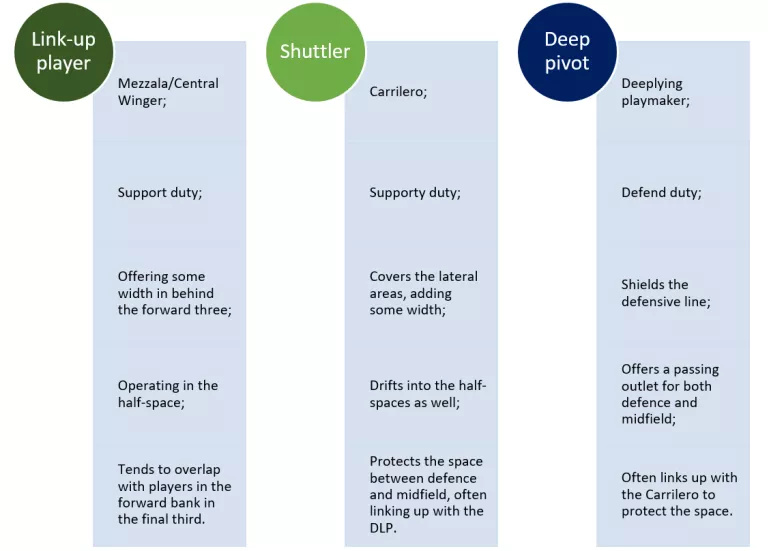
Two of these roles, the Carrilero and Mezzala, are new to the game. I have opted to use these roles because they have hardcoded special behaviours in the match engine, which will see them play slightly wider than the other central midfielder roles available in the game. Considering the fact that my formation is already rather narrow in the way it lines up on the pitch, I can use whatever width I can add to the mix.
The idea is that these roles interact with each other to create a kind of layering or staggering in the way they line up. The mezzala is supposed to actively seek space in the half-space, trying to get into attacking positions and linking up with the forward bank of three. Similarly, the carrilero, who is more of a supporting player, will provide support in the wider areas as well as shield the central area. Because of the mezzala’s movement forward, he will make room for the deep-lying playmaker to step forward and form a two-man block in central midfield.
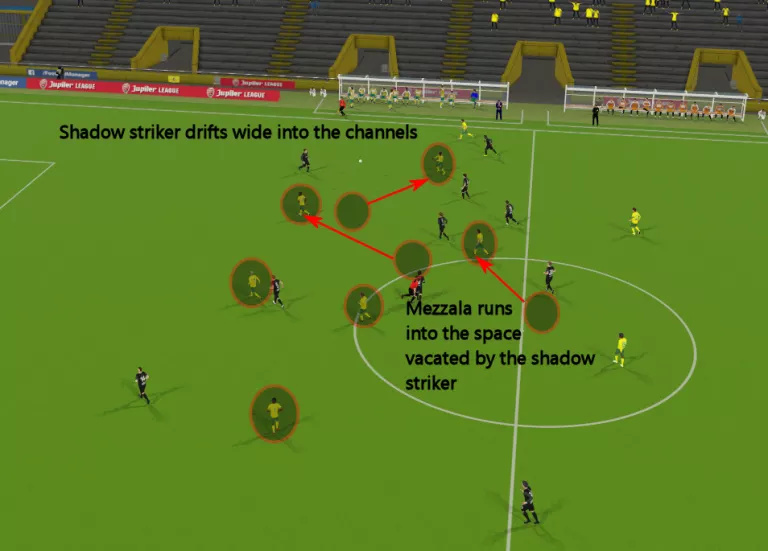
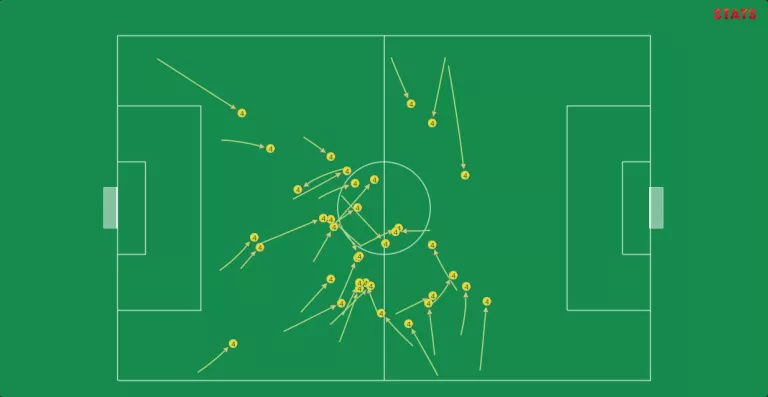
Typical movement by this midfield is showing this layering that I like to see. Our defence intercepts the ball and clears it towards the flank. The wingback looks for a team-mate in space and finds one of the attacking midfielders in space, dropping back into space in the channels. The attacking midfielder receives and controls the pass and holds it up, whilst his team-mates surge forward to take up their offensive positions. A quick flick-through sees the mezzala, whose run takes him through the position previously occupied by the attacking midfielder and his defender, go clean through on goal to cap a nice move with a clinical finish. Meanwhile, the deep-lying playmaker advances to take up a role more or less beside the carrilero in central midfield.
Whilst I characterise this move as being typical strikerless, the underlying concepts and principles can and should be universally applied to any formation and style of play. The reason why my teams play the way they do is that I try to layer the attacks, attacking a defence in multiple waves, making it harder for a defensive side to maintain a cohesive defensive line and adding an element of surprise to the equation.
Good off-the-ball movement is always an important element of any good formation. Any team worth their salt will try to refrain from using a one-dimensional style of play, which means they will try to not only have players moving into space to receive the ball but also to make shadow runs, which means they are trying to create space for others by dragging defenders out of position. The image I referred to earlier shows a nice example of this. Because the attacking midfielder drops back between the lines, the defender is dragged out of position, which makes the defensive line susceptible to a through-ball down the middle.
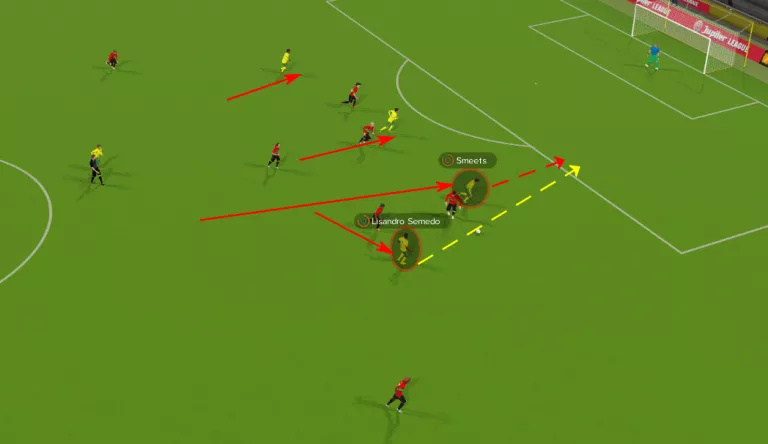
Above is another example of players feeding off each other’s movement, which is a concept that only really works if there is another player moving to exploit the space. This means that the team should preferably play in a cohesive formation, but should definitely have different layers. If every line makes the same run at the same time, the attacking patterns become predictable and easy to defend. A more irregular approach, with players arriving at different locations and times, tends to be more difficult to defend.
When applied correctly, this means that a single run by for example an attacking midfielder can open up space for three or more others nearby, waiting to pounce on positional weaknesses by the opposing team. This knock-on effect of movements is quite versatile and something you should use. An attacking midfielder dropping back into midfield creates space for a winger to run into, which in turn creates space out wide for an attacking full-back or wing-back to overlap.
Movement both on and off the ball is absolutely crucial to the success of the formation and the style of play. This particular formation and style rely on the exploiting of space. When your players remain static, no space will open up for others to exploit. This is again where the layering of attacks comes into play. In any tactic I create, I strive for the creation of at least three but preferably four or five different layers of attacking players. The combination of roles I have selected is geared to generate as much movement as possible without sacrificing defensive stability.
The three-headed beast
The forward line is what makes this tactic great; the three-headed beast that devours opponents and destroys leagues. As always and more or less traditional, I have opted for a setup with two shadow strikers and my so-called withdrawn targetman. With the option to instruct a regular attacking midfielder to hold up the ball removed from the game (at least, in this Beta), I have resurrected the targetenganche to act as my focal point for attacks.
Essentially, I am looking for a cross-pollination of the targetman role and the enganche role. In a way, it makes sense, as the enganche already incorporates some of the qualities a targetman is supposed to offer to a team. A targetman is a striker who is the target of passes from his teammates. A good target man will possess the strength to hold up the ball, hold off opponents and bring team-mates into play. Target men are often tall, physical players who operate with their back to goal.
The enganche has to link the shadow strikers into the supporting cast of players behind them, essentially the carrilero and mezzala. The enganche is the player that receives the ball and chooses how and when to pass the ball to maximise the potential of the attacking movement. Mix those two up and you get the Targetganche™, or the Withdrawn Targetman I want to see in the game. He will hold up the ball and bring his team-mates into play, choosing how and when to pass the ball to maximise the potential of the attacking movement.
The other two forwards are shadow strikers, ideal for quick counterattacking combinations between pacey forwards or perhaps even being sent deep by some through-ball. Due to their inherent explosiveness, they are highly effective to progress through the opposition defence or chase after balls over the top of the defenders. The co-existence and synergy between the static enganche and more mobile threat of the shadow strikers is a truly beautiful thing.
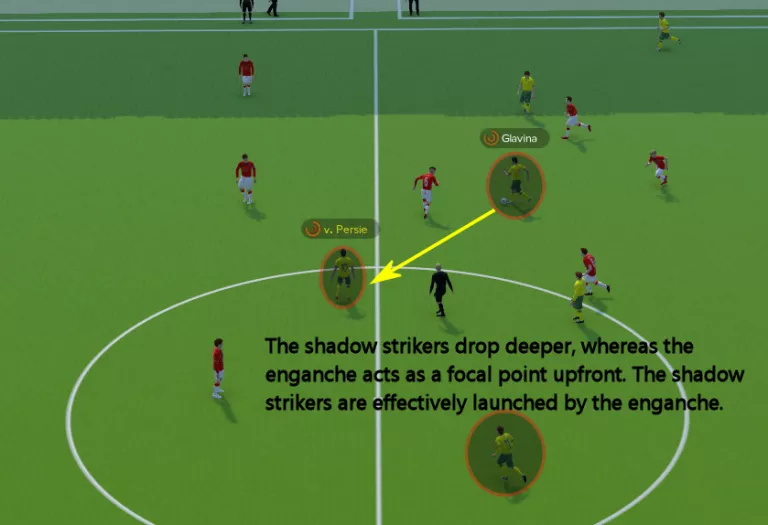
The shadow strikers seem to have a natural inclination to drop deeper. From a manager’s perspective, fielding a forward line consisting of only shadow strikers is therefore not very effective, as your passing efforts lack a focal point, someone to pass the ball to. Tight and cohesive lines are ideal when your team is defending, when your team has the ball it’s a potential disaster, as your team can be easily pressured into losing the ball or just hoofing the ball forward.
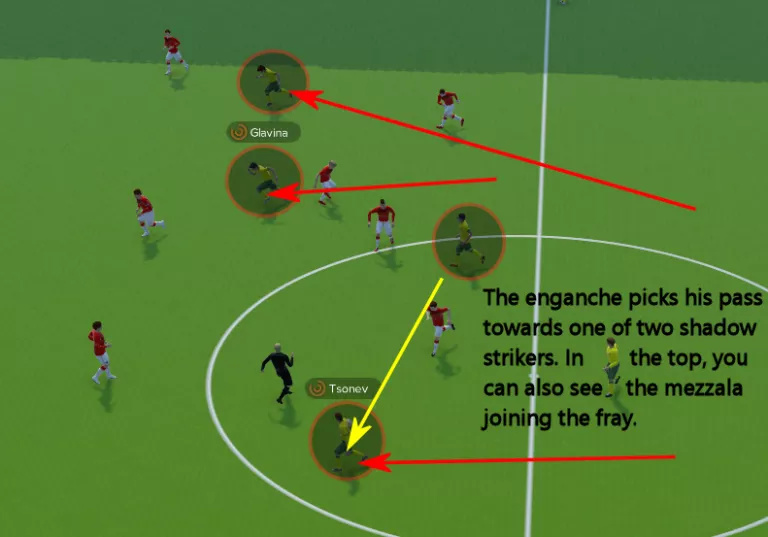
Our creative yet static enganche has plenty of passing options available if he manages to find space to swivel on the ball. The shadow strikers tend to surge past the enganche, pouring into space. We’ve already established that the movement of the mezzala adds another layer to the offensive game this Cerberus tactic offers.
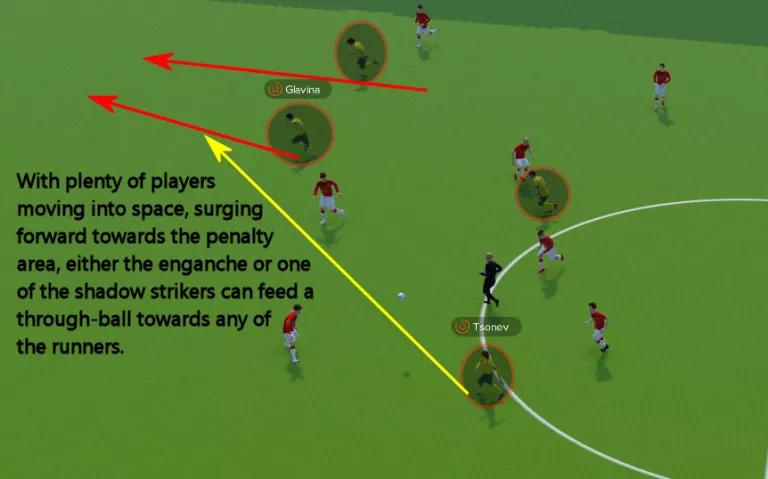
With plenty of passing options available, either the enganche or any of the running players can pick a pass and launch his compatriots into space, towards the opposition’s goal. The movement generated by the distribution of roles throughout the forward line and midfield always ensures running players available to receive a pass.
Alternating mentalities
Addressing the team’s mentality is a difficult task, as it has an impact on a variety of other factors of the tactic. I used to try and set a default base tactic that needed only a little tweaking. It wasn’t quite plug-and-play but it was to provide me with a robust and sturdy framework that could be tweaked within matches. That usually meant changing the mentality to suit my needs within a game, leaving the roles and instructions alone. Most of that tweaking of the team’s mentality was done to sort the pressing game of the team.
Pressing and pressing triggers
Pressing is basically moving your players into a position where they can generate pressure on the opposing team with the intent of getting the ball. The keyword here is “intent.” When your team is pressing, they are actively trying to win the ball from the opposing side by moving out of position and/or actively disrupting the formation of the opposing team. If a team moves close but their intent is not to win the ball but merely to contain the opposing team, that is not pressing. Your team’s intention is to defend their own goal by stopping them from getting into positions where they can take a shot, without actively trying to win the ball.
By altering the mentality of the tactic, you change, among other things, the default defensive line, width, closing down and individual player mentalities. All of these have a severe impact on the pressing game you’re trying to achieve. Cerberus was, in the mythological sense, a guard dog, guarding the gates to Hades, the Greek underworld. The pressing formation of this tactic guards it’s defensive line and the various mentalities determine how and where I want to press an opposing team.
One of the key components of an effective press is being in the position to actually being able to press. Your players should be positioned to establish access to the ball. You can’t pressure an opponent if you’re nowhere near him, barring the odd psychic wonder perhaps.
This where the aforementioned instructions come into play. They determine how your team’s current formation and shape is altered. When your team’s pressing efforts are proving ineffectual, you may want to alter the team’s shape somewhat. As with all elements in Football Manager, this is a careful balancing act. Every advantage has an inherent disadvantage as well.
For example, playing a wider formation could grant your players easier access to opposing wide players but it can also leave them more isolated, with their teammates further away than they usually would be. Similarly, playing in a more narrow formation creates a compact and cohesive unit of players, while simultaneously ceding the wide areas of the pitch to your opponents.
You have to look at what kind of pressing game you want to play, where your players should position themselves in order to establish access to their opponents and the ball. In this regard, football literature distinguishes various pressing zones. The German FA teaches its coaches to work with a specific schedule that divides the pitch into six zones.
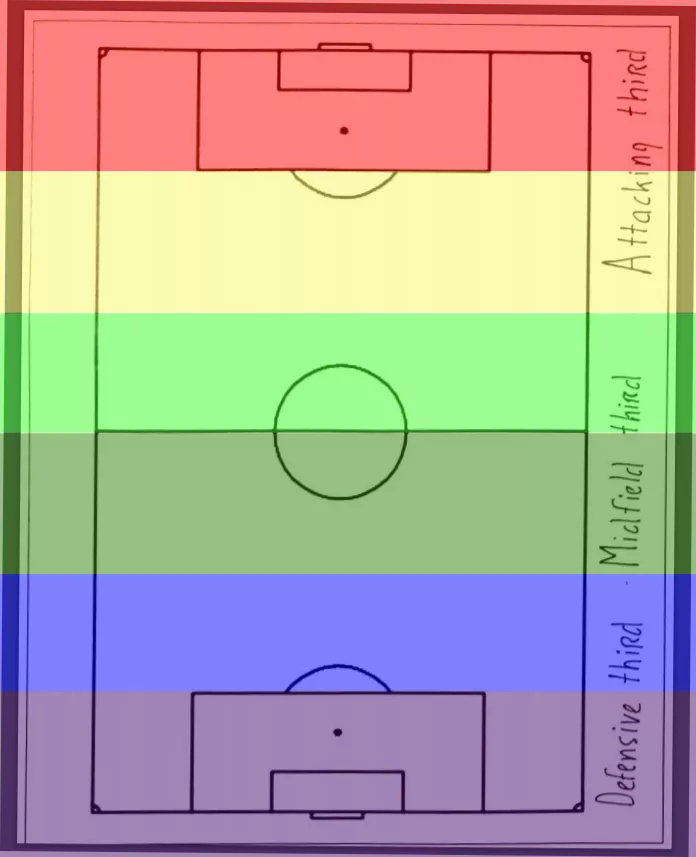
In this German model, the field is split into three horizontal thirds; the attacking, midfield, and defending thirds. As anticipated, attacking pressing occurs in the attacking third, midfield pressing occurs in the midfield third, and defensive pressing occurs in the defensive third. The model also divides each third into a high and a deep zone. In the picture above, the red/yellow third is the attacking third, where the red zone represents the high attacking zone and the yellow zone represent the deep attacking zone. Similarly, the green third is the midfield third, where the light green zone represents the high midfield zone and the dark green zone represent the deep midfield zone. Finally, the blue/purple third is the defensive third, where the blue zone represents the high defensive zone and the purple zone represent the deep defensive zone.
Back to the balancing act. Your initial formation determines your defensive outlay. The instructions you select to alter the team shape can help you to establish access to the ball for your players. When your team can pressure the ball, this action allows the rest of the team in the deeper layers to push towards the ball and leave space on the far side of the field open.
This effectively allows you to create a sort of pressing trap. A pressing trap invites the opponent to act in a specific zone in their formation. Pressing traps can vary as well; aspects of the trap include where the trap is set up to isolate the opponent, how many players participate in the trap, the type of pressing when closing the trap, how the opponent is isolated, when the trap is set, and more.
Altering the mentality of the team effectively changes the primary areas of access to the ball and therefore changes the team’s pressing efforts. Essentially, I distinguish three types of pressing by the area they look to impact:
The attacking press, which consists of a high block press on an attacking or overload mentality;
The midfield press, which consists of a middle block press on a counter, normal or control mentality;
The defensive press, which consists of a low block press on a contain or defensive mentality.
Attacking (high block + Attacking/Overload)
Our high block pressing is effectively a blitzing strategy, which sees the defensive side commit a lot of bodies to the fray, pressing the opposing players deep inside their own half. The pressure is mostly aimed at the defenders and defensive midfielders of the opposing side. Naturally, this means you employ such a press with an attacking or an overload mentality, as this ensures more players are pushed into the area you wish to press. Besides the usual instructions, you can opt to reinforce this form of pressing with specific opposition instructions.
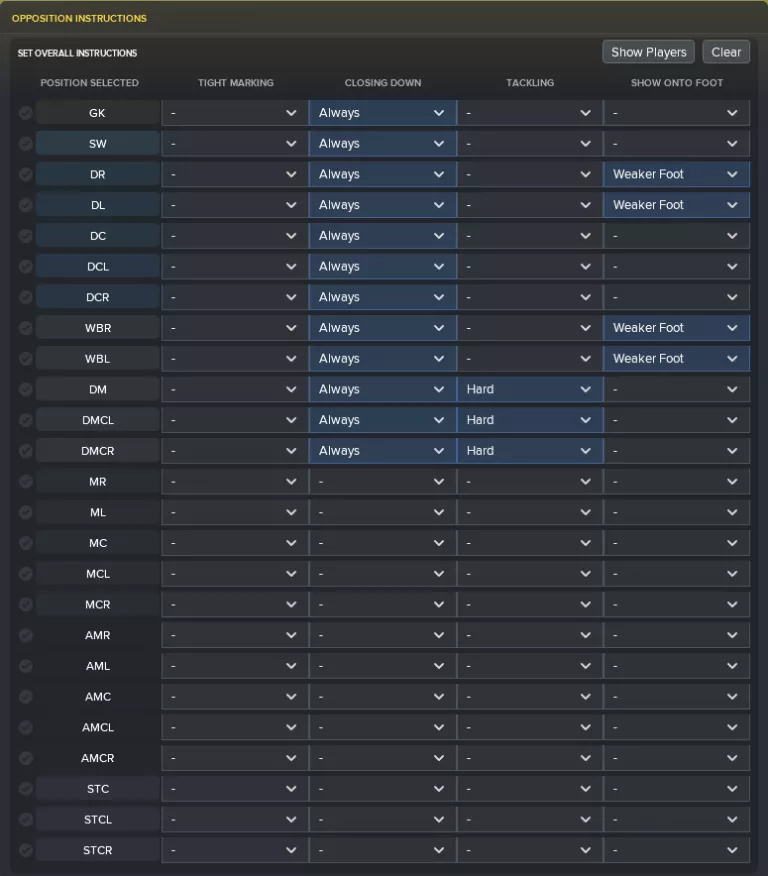
The idea of this aggressive form of pressing is that when you lose the ball in the final third, you set out on winning back possession as quickly as possible. This is the form of pressing managers like Klopp, Tüchel and to a lesser extend Pocchettino employ. The idea is that you force mistakes and rushed passing by the backline, while simultaneously dealing with any deep-lying playmakers dropping back to help out with the buildup from the back. The wide players are forced onto their weaker foot, again forcing them to hit the ball long or out of bounds. The hard-tackling settings for the defensive midfielders are necessary to disrupt the opposition’s defensive midfielders and slow them down in getting the ball past the initial press.
Midfield (middle block + Counter/Normal/Control)
Our middle block pressing is aimed at disrupting the opposition’s midfield. Your pressing will primarily focus on the players in the midfield stratum, though you can opt to include defensive midfielders or attacking midfielders in this press if their positioning sees them move forward or drop deep into midfield a lot. The more conservative mentalities are usually best suited for this type of pressing. Besides the usual instructions, you can opt to reinforce this form of pressing with specific opposition instructions.
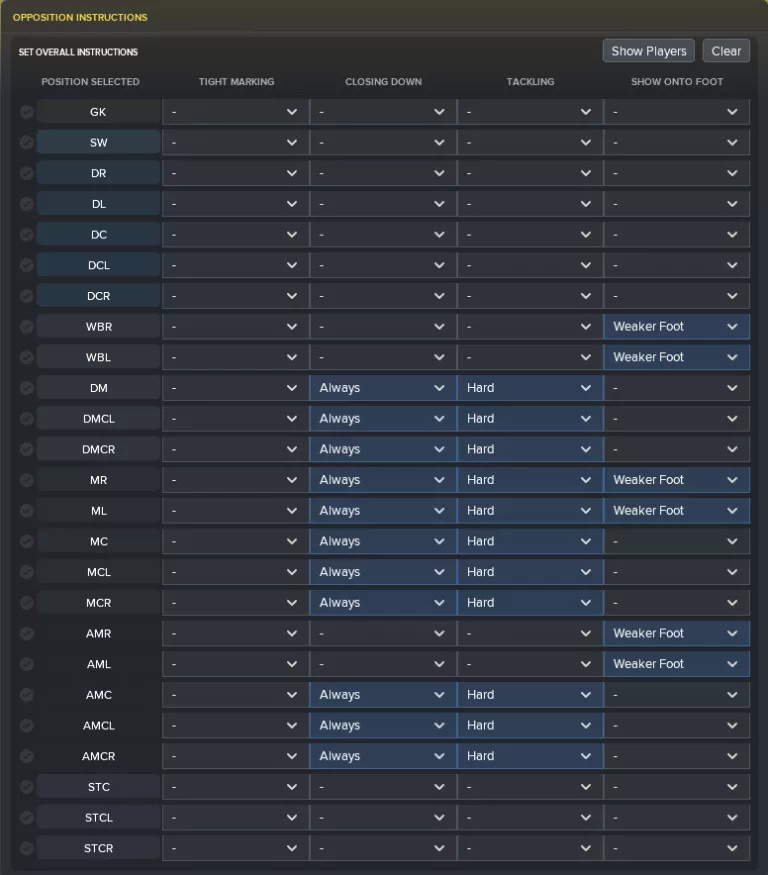
This form of pressing is more conservative in the area of pressing, not in its ferociousness. Instead of pressing high up the pitch, the team drops deeper and organises around the halfway line. As soon as the ball enters that area, which usually happens when one of the opposing midfielders receives the ball, the pressing trap snaps shut and the team starts hounding their opponents into making mistakes and gifting our team possession of the ball.
I deliberately ignore the opposing defenders, which makes sense. I also deliberately ignore the opposing wingbacks. The idea behind this is that my formation is a relatively narrow one. Pressuring the opposing wingbacks would invariably lead to my players being drawn out of position and space appearing between the lines. Should the wingbacks venture further forward, I want them showed onto their weaker foot to nullify the threat of their crosses into the box somewhat, but a more aggressive approach towards them would lead to my defensive shape being disrupted.
Similarly, I generally do not press the opposing wingers. By pressing them, I either commit a wingback to venture forward with space behind him or one of the midfielders to drop back. Either way, this creates gaps in my defensive formation and a loss of cohesion within the team structure.
This pressing trap is designed to battle for midfield. Your main efforts are focussed towards taking on the opposing midfielders and preventing them from feeding the ball towards the wide players or forwards. The buildup play from the back generally happens pretty much unopposed, but as soon as the opposition reaches the high midfield zone, the attacking midfielders and regular midfielders start their pressing.
Defensive (low block + Contain/Defensive)
Or defensive or low block pressing is aimed at inviting the opposition to pour men onto our half, soaking up the pressure and then hitting the opposing team on the break. This pressing trap is designed to establish a perimeter in and just outside our own penalty area. The most defensive mentalities are the ones that are best employed with a defensive block. Besides the usual instructions, you can opt to reinforce this form of pressing with specific opposition instructions.
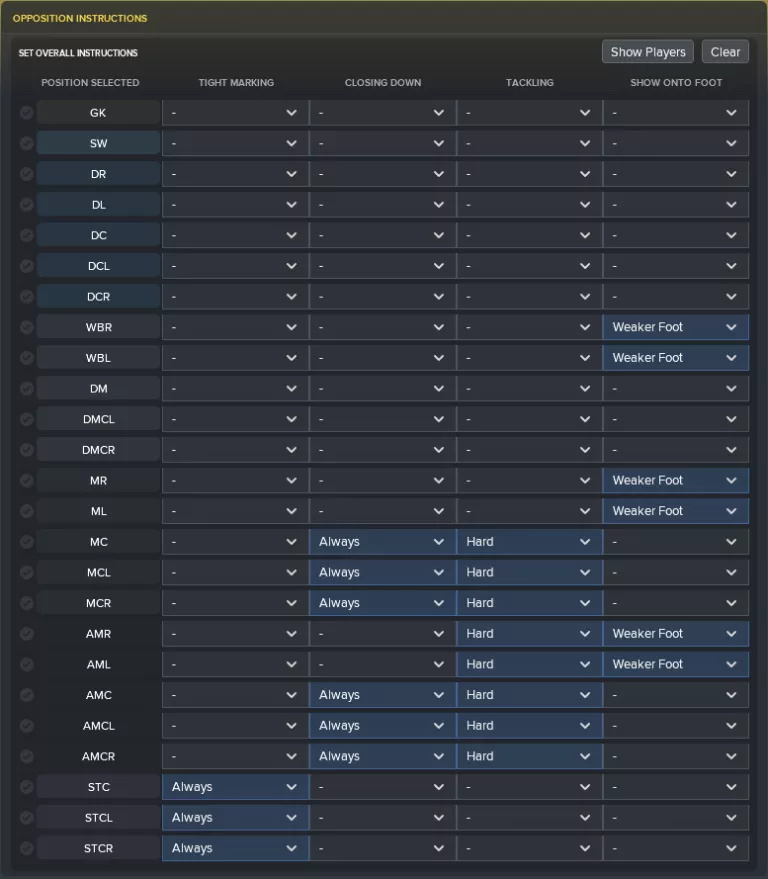
When your team’s forte is the ability to soak up pressure before striking on the counterattack, this low block pressing setup would be ideal. In this setup, the team looks to occupy the area in and around its own penalty area, while pressuring the opponents near the ball yet also maintaining a good overall structure. Facing a shield wall of defenders, opposition teams are forced to use very quick attacking moves, consisting of one or two touches, in our defensive third.
The default posture of the team is to sit deep in a narrow, compact shape in order to prevent the opponent from creating scoring chances. I am happy to concede time and space outside of the penalty area to the opposition. Most teams are unlikely to score from outside the area, so I am willing to give that space in order to stay organized and compact in our defence of the area of the field that actually matters. We soak up the pressure in and around the penalty area, somewhat like an NBA team that is willing to let a team pass the ball around the three-point arc but never allows them to pass the ball into the area immediately around the hoop.
This setup aims to nullify the threat of the opposing strikers by sticking close to them while trying to shut down the passing lanes towards these strikers by pressuring the attacking midfielders and central midfielders. Unlike the other blocks, in this deeper shape, we do take on the wingers. We cannot allow them to roam freely and with such compact lines, there is always cover for the defender who takes on the wingers. The other wide players are not pressured, they are just forced onto their weaker foot.
Hybrid pressing forms
Naturally, hybrid pressing forms are a very real possibility. These pressing traps are not written in stone and can, therefore, be tweaked and altered as a manager sees fit. Perhaps you wish to place more emphasis on negating the threat posed by an opposing dangerman, or maybe you have identified a weak link in the opposing team you wish to exploit. Maybe you are torn between using two shapes and you wish to create a sort of hybrid pressing trap. Feel free to experiment with these, my examples above are not mandatory to use and there are many other options.
How do you determine which mentality to use?
So with all these forms and options, how do you determine which one will suit you best? This is where things become somewhat complicated. My rule of thumb is to start the game on Control, unless I am expected to be the underlying party, in which case I will start on Counter. During the game, I tend to shift to other mentality settings depending on how the game develops. This version of the game forces me to play more versatile. Defend or Contain are ideal for seeing out a game, whereas Attack or Overload are good for trying to force in an extra goal.
Breaking with tradition; fluidity
In the past, I have always worked with a Very Fluid setup, because it suited my needs in terms of compact formations. In FM18, I have broken away from this setup, as the Very Fluid team-shape in combination with the relentless pressing saw my players run all over the place and break defensive shape too often. Instead, I have opted for a more structured approach.
A more structured mentality will make my more attacking and defending duty players deviate from the team mentality you choose, hence reducing compactness somewhat, but it also means the players will stick to their positions more, thus protecting the overall integrity of the defensive shape.
Guido, where are the download links and such?
Yeah, sorry about that… As I expect to compete in the Copa Manageria this weekend, download links will be provided after the weekend. I don’t want people snooping around too much in my gameplans.
Update 13/11 – The download
As promised, after my Copa Manageria campaign, this is the tactic that got me the silver medal.